When you want to make a connection to one of the Google APIs provided in the Google Play services
library (such as Google+, Games, or Drive), you need to create an instance of GoogleApiClient ("Google API Client"). The Google API Client provides a common entry point to all
the Google Play services and manages the network connection between the user's device and each
Google service.
Connecting to REST APIs
If the Google API you want to use is not included in the Google Play services library, you can connect using the appropriate REST API, but you must obtain an OAuth 2.0 token. For more information, read Authorizing with Google for REST APIs.
This guide shows how you can use Google API Client to:
- Connect to one or more Google Play services asynchronously and handle failures.
- Perform synchronous and asynchronous API calls to any of the Google Play services.
Note: If you have an existing app that connects to Google Play services with a
subclass of GooglePlayServicesClient, you should migrate to GoogleApiClient as soon as possible.
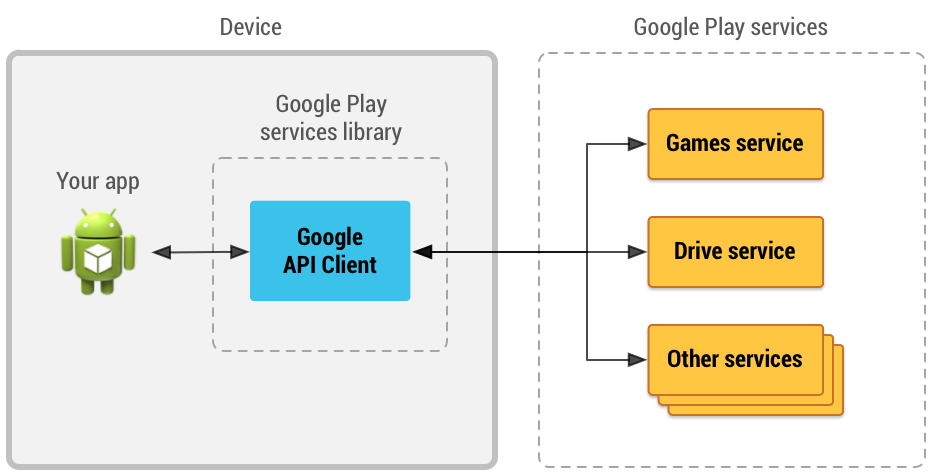
Figure 1. An illustration showing how the Google API Client provides an interface for connecting and making calls to any of the available Google Play services such as Google Play Games and Google Drive.
To get started, you must first install the Google Play services library (revision 15 or higher) for your Android SDK. If you haven't done so already, follow the instructions in Set Up Google Play Services SDK.
Start a Connection
Once your project is linked to the Google Play services library, create an instance of GoogleApiClient using the GoogleApiClient.Builder APIs in your activity's onCreate() method. The GoogleApiClient.Builder class
provides methods that allow you to specify the Google APIs you want to use and your desired OAuth
2.0 scopes. For example, here's a GoogleApiClient instance that connects with the Google
Drive service:
GoogleApiClient mGoogleApiClient = new GoogleApiClient.Builder(this)
    .addApi(Drive.API)
    .addScope(Drive.SCOPE_FILE)
    .build();
You can add multiple APIs and multiple scopes to the same GoogleApiClient by appending
additional calls to
addApi() and
addScope().
Important: To avoid client connection errors on devices that do not have the
Android
Wear app installed, use a separate GoogleApiClient instance to access only the Wearable API. For more information, see Access the Wearable
API.
Before you can begin a connection by calling connect() on the GoogleApiClient, you must specify an implementation for the callback interfaces, ConnectionCallbacks and OnConnectionFailedListener. These interfaces receive callbacks in
response to the asynchronous connect() method when the connection to Google Play services
succeeds, fails, or becomes suspended.
For example, here's an activity that implements the callback interfaces and adds them to the Google API Client:
import gms.common.api.*;
import gms.drive.*;
import android.support.v4.app.FragmentActivity;

public class MyActivity extends FragmentActivity
        implements ConnectionCallbacks, OnConnectionFailedListener {
    private GoogleApiClient mGoogleApiClient;

    @Override
    protected void onCreate(Bundle savedInstanceState) {
        super.onCreate(savedInstanceState);

        // Create a GoogleApiClient instance
        mGoogleApiClient = new GoogleApiClient.Builder(this)
                .addApi(Drive.API)
                .addScope(Drive.SCOPE_FILE)
                .addConnectionCallbacks(this)
                .addOnConnectionFailedListener(this)
                .build();
        ...
    }

    @Override
    public void onConnected(Bundle connectionHint) {
        // Connected to Google Play services!
        // The good stuff goes here.
    }

    @Override
    public void onConnectionSuspended(int cause) {
        // The connection has been interrupted.
        // Disable any UI components that depend on Google APIs
        // until onConnected() is called.
    }

    @Override
    public void onConnectionFailed(ConnectionResult result) {
        // This callback is important for handling errors that
        // may occur while attempting to connect with Google.
        //
        // More about this in the next section.
        ...
    }
}
With the callback interfaces defined, you're ready to call connect(). To gracefully manage
the lifecycle of the connection, you should call connect() during the activity's onStart() (unless you want to connect later), then call disconnect() during the onStop() method. For example:
    @Override
    protected void onStart() {
        super.onStart();
        if (!mResolvingError) {  // more about this later
            mGoogleApiClient.connect();
        }
    }

    @Override
    protected void onStop() {
        mGoogleApiClient.disconnect();
        super.onStop();
    }
However, if you run this code, there's a good chance it will fail and your app will receive a call
to onConnectionFailed() with the SIGN_IN_REQUIRED error because the user account
has not been specified. The next section shows how to handle this error and others.
Handle connection failures
When you receive a call to the onConnectionFailed() callback, you should call hasResolution() on the provided ConnectionResult object. If it returns true, you can
request the user take immediate action to resolve the error by calling startResolutionForResult() on the ConnectionResult object. The startResolutionForResult() behaves the same as startActivityForResult() and launches the
appropriate activity for the user
to resolve the error (such as an activity to select an account).
If hasResolution() returns false, you should instead call GooglePlayServicesUtil.getErrorDialog(), passing it the error code. This returns a Dialog provided by Google Play services that's appropriate for the given error. The
dialog may simply provide a message explaining the error, but it may also provide an action to
launch an activity that can resolve the error (such as when the user needs to install a newer
version of Google Play services).
For example, your onConnectionFailed() callback method should now look like this:
public class MyActivity extends FragmentActivity
        implements ConnectionCallbacks, OnConnectionFailedListener {

    // Request code to use when launching the resolution activity
    private static final int REQUEST_RESOLVE_ERROR = 1001;
    // Unique tag for the error dialog fragment
    private static final String DIALOG_ERROR = "dialog_error";
    // Bool to track whether the app is already resolving an error
    private boolean mResolvingError = false;

    ...

    @Override
    public void onConnectionFailed(ConnectionResult result) {
        if (mResolvingError) {
            // Already attempting to resolve an error.
            return;
        } else if (result.hasResolution()) {
            try {
                mResolvingError = true;
                result.startResolutionForResult(this, REQUEST_RESOLVE_ERROR);
            } catch (SendIntentException e) {
                // There was an error with the resolution intent. Try again.
                mGoogleApiClient.connect();
            }
        } else {
            // Show dialog using GooglePlayServicesUtil.getErrorDialog()
            showErrorDialog(result.getErrorCode());
            mResolvingError = true;
        }
    }

    // The rest of this code is all about building the error dialog

    /* Creates a dialog for an error message */
    private void showErrorDialog(int errorCode) {
        // Create a fragment for the error dialog
        ErrorDialogFragment dialogFragment = new ErrorDialogFragment();
        // Pass the error that should be displayed
        Bundle args = new Bundle();
        args.putInt(DIALOG_ERROR, errorCode);
        dialogFragment.setArguments(args);
        dialogFragment.show(getSupportFragmentManager(), "errordialog");
    }

    /* Called from ErrorDialogFragment when the dialog is dismissed. */
    public void onDialogDismissed() {
        mResolvingError = false;
    }

    /* A fragment to display an error dialog */
    public static class ErrorDialogFragment extends DialogFragment {
        public ErrorDialogFragment() { }

        @Override
        public Dialog onCreateDialog(Bundle savedInstanceState) {
            // Get the error code and retrieve the appropriate dialog
            int errorCode = this.getArguments().getInt(DIALOG_ERROR);
            return GooglePlayServicesUtil.getErrorDialog(errorCode,
                    this.getActivity(), REQUEST_RESOLVE_ERROR);
        }

        @Override
        public void onDismiss(DialogInterface dialog) {
            ((MainActivity)getActivity()).onDialogDismissed();
        }
    }
}
Once the user completes the resolution provided by startResolutionForResult() or GooglePlayServicesUtil.getErrorDialog(), your activity receives the onActivityResult() callback with the RESULT_OK
result code. You can then call connect() again. For example:
@Override
protected void onActivityResult(int requestCode, int resultCode, Intent data) {
    if (requestCode == REQUEST_RESOLVE_ERROR) {
        mResolvingError = false;
        if (resultCode == RESULT_OK) {
            // Make sure the app is not already connected or attempting to connect
            if (!mGoogleApiClient.isConnecting() &&
                    !mGoogleApiClient.isConnected()) {
                mGoogleApiClient.connect();
            }
        }
    }
}
In the above code, you probably noticed the boolean, mResolvingError. This keeps track of
the app state while the user is resolving the error to avoid repetitive attempts to resolve the
same error. For instance, while the account picker dialog is showing to resolve the SIGN_IN_REQUIRED error, the user may rotate the screen. This recreates your activity and causes
your onStart() method to be called again, which then calls connect() again. This results in another call to startResolutionForResult(), which
creates another account picker dialog in front of the existing one.
This boolean is effective only if retained across activity instances, though. The next section explains further.
Maintain state while resolving an error
To avoid executing the code in onConnectionFailed() while a previous attempt to resolve an
error is ongoing, you need to retain a boolean that tracks whether your app is already attempting
to resolve an error.
As shown in the code above, you should set a boolean to true each time you call startResolutionForResult() or display the dialog from GooglePlayServicesUtil.getErrorDialog(). Then when you
receive RESULT_OK in the onActivityResult() callback, set the boolean to false.
To keep track of the boolean across activity restarts (such as when the user rotates the screen),
save the boolean in the activity's saved instance data using onSaveInstanceState():
private static final String STATE_RESOLVING_ERROR = "resolving_error";

@Override
protected void onSaveInstanceState(Bundle outState) {
    super.onSaveInstanceState(outState);
    outState.putBoolean(STATE_RESOLVING_ERROR, mResolvingError);
}
Then recover the saved state during onCreate():
@Override
protected void onCreate(Bundle savedInstanceState) {
    super.onCreate(savedInstanceState);

    ...
    mResolvingError = savedInstanceState != null
            && savedInstanceState.getBoolean(STATE_RESOLVING_ERROR, false);
}
Now you're ready to safely run your app and connect to Google Play services.
How you can perform read and write requests to any of the Google Play services
using GoogleApiClient is discussed in the next section.
For more information about each services's APIs available once you're connected, consult the corresponding documentation, such as for Google Play Games or Google Drive.
Access the Wearable API
On devices that do not have the Android
Wear app installed, connection requests that include the Wearable API fail with the
API_UNAVAILABLE error code. If your app uses the Wearable API in addition to other Google APIs, use a separate GoogleApiClient instance to access the Wearable API. This approach enables you to access other Google APIs on devices that are not
paired with a wearable device.
When you use a separate GoogleApiClient instance to access only the Wearable API, you can determine
whether the Android
Wear app is installed on the device:
// Connection failed listener method for a client that only
// requests access to the Wearable API
@Override
public void onConnectionFailed(ConnectionResult result) {
    if (result.getErrorCode() == ConnectionResult.API_UNAVAILABLE) {
        // The Android Wear app is not installed
    }
    ...
}
Communicate with Google Services
Once connected, your client can make read and write calls using the service-specific APIs for which
your app is authorized, as specified by the APIs and scopes you added to your GoogleApiClient instance.
Note: Before making calls to specific Google services, you may first need to register your app in the Google Developer Console. For specific instructions, refer to the appropriate getting started guide for the API you're using, such as Google Drive or Google+.
When you perform a read or write request using Google API Client, the immediate result is returned
as a PendingResult object. This is an object representing the request, which hasn't yet
been delivered to the Google service.
For example, here's a request to read a file from Google Drive that provides a
PendingResult object:
Query query = new Query.Builder()
        .addFilter(Filters.eq(SearchableField.TITLE, filename));
PendingResult result = Drive.DriveApi.query(mGoogleApiClient, query);
Once you have the
PendingResult, you can continue by making the request either asynchronous
or synchronous.
Using asynchronous calls
To make the request asynchronous, call setResultCallback() on the
PendingResult and
provide an implementation of the ResultCallback interface. For example, here's the request
executed asynchronously:
private void loadFile(String filename) {
    // Create a query for a specific filename in Drive.
    Query query = new Query.Builder()
            .addFilter(Filters.eq(SearchableField.TITLE, filename))
            .build();
    // Invoke the query asynchronously with a callback method
    Drive.DriveApi.query(mGoogleApiClient, query)
            .setResultCallback(new ResultCallback<DriveApi.MetadataBufferResult>() {
        @Override
        public void onResult(DriveApi.MetadataBufferResult result) {
            // Success! Handle the query result.
            ...
        }
    });
}
When your app receives a Result
object in the onResult() callback, it is delivered as an instance of the
appropriate subclass as specified by the API you're using, such as DriveApi.MetadataBufferResult.
Using synchronous calls
If you want your code to execute in a strictly defined order, perhaps because the result of one
call is needed as an argument to another, you can make your request synchronous by calling await() on the
PendingResult. This blocks the thread and returns the Result object
when the request completes, which is delivered as an instance of the
appropriate subclass as specified by the API you're using, such as DriveApi.MetadataBufferResult.
Because calling await() blocks the thread until the result arrives, it's important that you
never perform this call on the UI thread. So, if you want to perform synchronous requests to a
Google Play service, you should create a new thread, such as with AsyncTask in
which to perform the request. For example, here's how to perform the same file request to Google
Drive as a synchronous call:
private void loadFile(String filename) {
    new GetFileTask().execute(filename);
}

private class GetFileTask extends AsyncTask<String, Void, Void> {
    protected void doInBackground(String filename) {
        Query query = new Query.Builder()
                .addFilter(Filters.eq(SearchableField.TITLE, filename))
                .build();
        // Invoke the query synchronously
        DriveApi.MetadataBufferResult result =
                Drive.DriveApi.query(mGoogleApiClient, query).await();

        // Continue doing other stuff synchronously
        ...
    }
}
Tip: You can also enqueue read requests while not connected to Google Play services. For example, execute a method to read a file from Google Drive regardless of whether your Google API Client is connected yet. Then once a connection is established, the read requests execute and you'll receive the results. Any write requests, however, will generate an error if you call them while your Google API Client is not connected.