This lesson teaches you to
You should also read
Material design introduces elevation for UI elements. Elevation helps users understand the relative importance of each element and focus their attention to the task at hand.
The elevation of a view, represented by the Z property, determines the visual appearance of its shadow: views with higher Z values cast larger, softer shadows. Views with higher Z values occlude views with lower Z values; however, the Z value of a view does not affect the view's size.
Shadows are drawn by the parent of the elevated view, and thus subject to standard view clipping, clipped by the parent by default.
Elevation is also useful to create animations where widgets temporarily rise above the view plane when performing some action.
For more information about elevation in material design, see Objects in 3D space.
Assign Elevation to Your Views
The Z value for a view has two components:
- Elevation: The static component.
- Translation: The dynamic component used for animations.
Z = elevation + translationZ
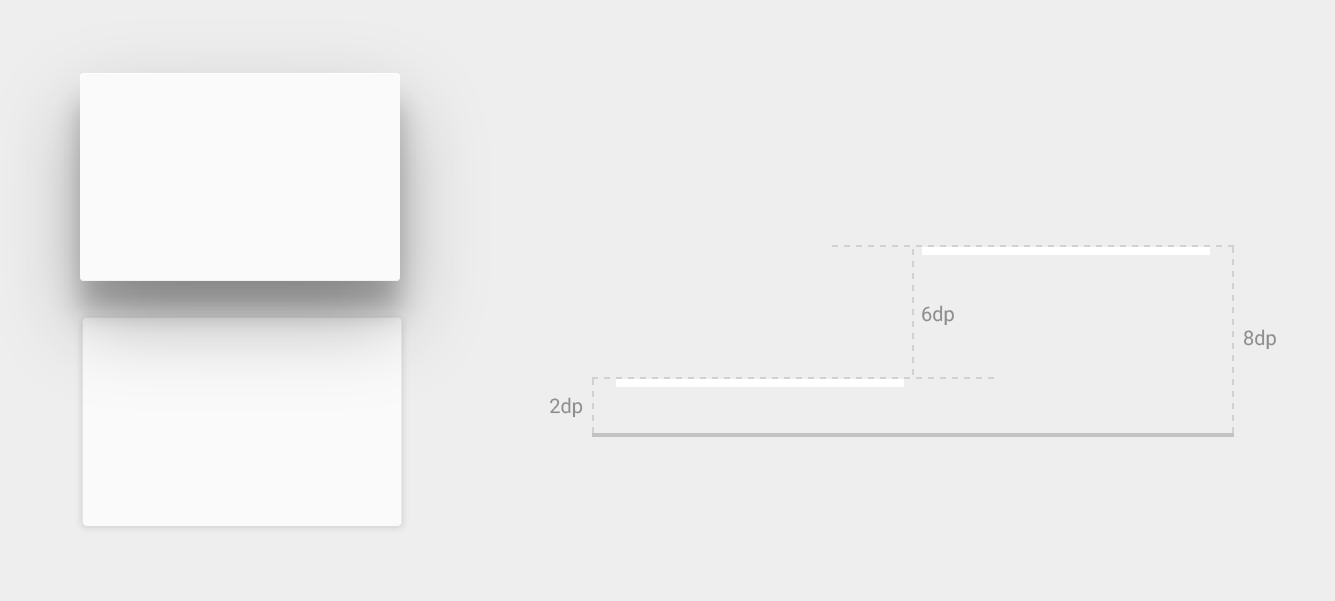
Figure 1 - Shadows for different view elevations.
To set the elevation of a view in a layout definition, use the android:elevation
attribute. To set the elevation of a view in the code of an activity, use the
View.setElevation() method.
To set the translation of a view, use the View.setTranslationZ() method.
The new ViewPropertyAnimator.z() and ViewPropertyAnimator.translationZ() methods enable
you to easily animate the elevation of views. For more information, see the API reference for
ViewPropertyAnimator and the Property Animation developer
guide.
You can also use a StateListAnimator to
specify these animations in a declarative way. This is especially useful for cases where state
changes trigger animations, like when a user presses a button. For more information, see
Animate View State Changes.
The Z values are measured in dp (density-independent pixels).
Customize View Shadows and Outlines
The bounds of a view's background drawable determine the default shape of its shadow. Outlines represent the outer shape of a graphics object and define the ripple area for touch feedback.
Consider this view, defined with a background drawable:
<TextView
    android:id="@+id/myview"
    ...
    android:elevation="2dp"
    android:background="@drawable/myrect" />
The background drawable is defined as a rectangle with rounded corners:
<!-- res/drawable/myrect.xml -->
<shape xmlns:android="http://schemas.android.com/apk/res/android"
       android:shape="rectangle">
    <solid android:color="#42000000" />
    <corners android:radius="5dp" />
</shape>
The view casts a shadow with rounded corners, since the background drawable defines the view's outline. Providing a custom outline overrides the default shape of a view's shadow.
To define a custom outline for a view in your code:
- Extend the
ViewOutlineProviderclass. - Override the
getOutline()method. - Assign the new outline provider to your view with the
View.setOutlineProvider()method.
You can create oval and rectangular outlines with rounded corners using the methods in the
Outline class. The default outline provider for views obtains the outline
from the view's background. To prevent a view from casting a shadow, set its outline provider
to null.
Clip Views
Clipping views enables you to easily change the shape of a view. You can clip views for
consistency with other design elements or to change the shape of a view in response to user input.
You can clip a view to its outline area using the View.setClipToOutline() method or the android:clipToOutline attribute. Only
rectangle, circle, and round rectangle outlines support clipping, as determined by the
Outline.canClip() method.
To clip a view to the shape of a drawable, set the drawable as the background of the view
(as shown above) and call the View.setClipToOutline()
method.
Clipping views is an expensive operation, so don't animate the shape you use to clip a view. To achieve this effect, use the Reveal Effect animation.