The AVD Manager is a tool you can use to create and manage Android virtual devices (AVDs), which define device configurations for the Android Emulator.
To launch the AVD Manager:
- In Android Studio, select Tools > Android > AVD Manager, or click
the AVD Manager icon
 in the toolbar.
 - Or, use the command line to navigate to your SDK's
tools/directory and execute:$ android avd
The AVD Manager main screen shows your current virtual devices, as shown in figure 1.
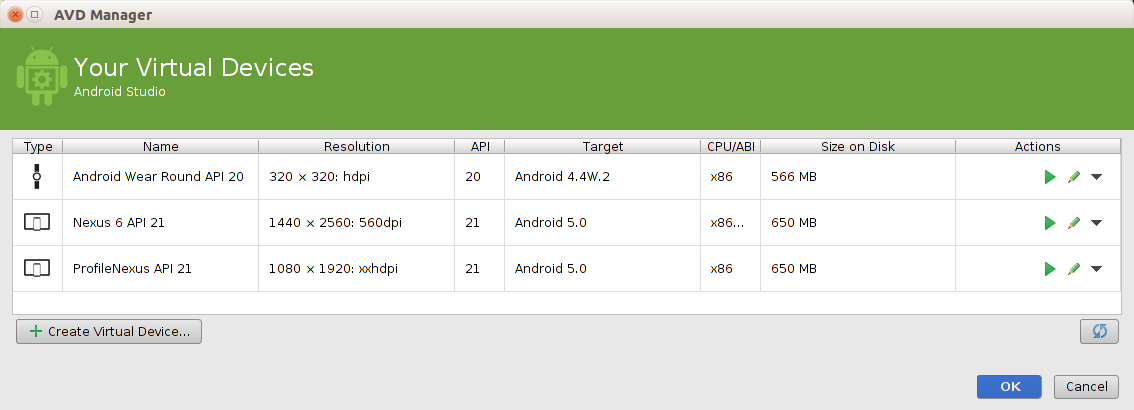
Figure 1. The AVD Manager main screen shows your current virtual devices.
Note: If you launch the AVD Manager from the command line, the UI is different than how it appears in Android Studio, as documented here. Most of the same functionality is available, but the command-line version of the AVD Manager is currently not documented.
Creating an AVD
You can create as many AVDs as you would like to use with the Android Emulator.
To effectively test your app, you should create an AVD that models each device type for which
you have designed your app to support. For instance, you should create an AVD for each
API level equal to and higher than the minimum version you've specified in your manifest
<uses-sdk> tag.
To create an AVD based on an existing device definition:
- From the main screen (figure 1), click Create Virtual Device.
In the Select Hardware window, select a device configuration, such as Nexus 6, then click Next.
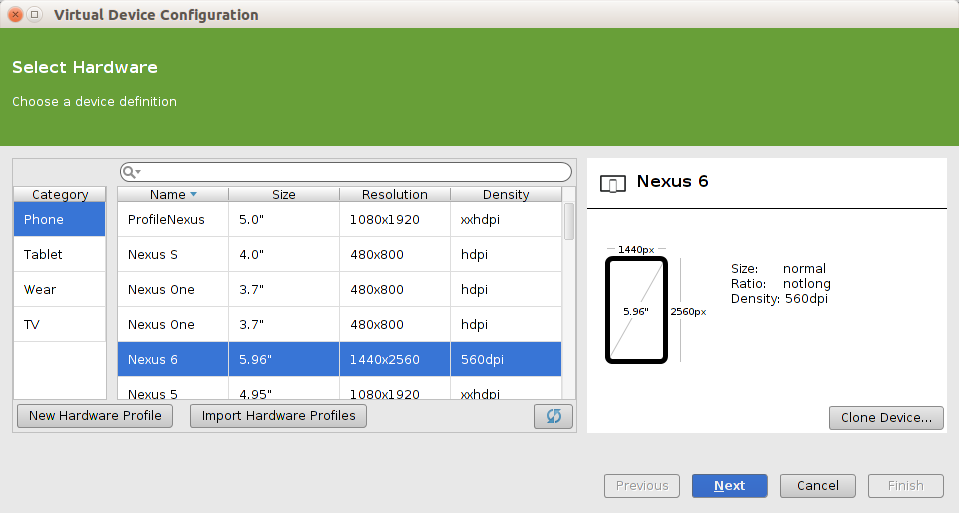
Figure 2. The Select Hardware window.
- Select the desired system version for the AVD and click Next.
- Verify the configuration settings, then click Finish.
If necessary, click Show Advanced Settings to select a custom skin for the hardware profile and adjust other hardware settings.
To launch the AVD in the Android Emulator, click the launch button
 in the list of AVDs.
Creating a device definition
In case the available device definitions do not match the device type you'd like to emulate, you can create a custom device definition for your AVD:
- From the main screen (figure 1), click Create Virtual Device.
- To begin you custom device by using an existing device profile as a template, select
a device profile then click Clone Device.
Or, to start from scratch, click New Hardware Profile.
-
The following Configure Hardware Profile window (figure 3) allows you to specify various configurations such as the screen size, memory options, input type, and sensors.
When you're done configuring the device, click Finish.
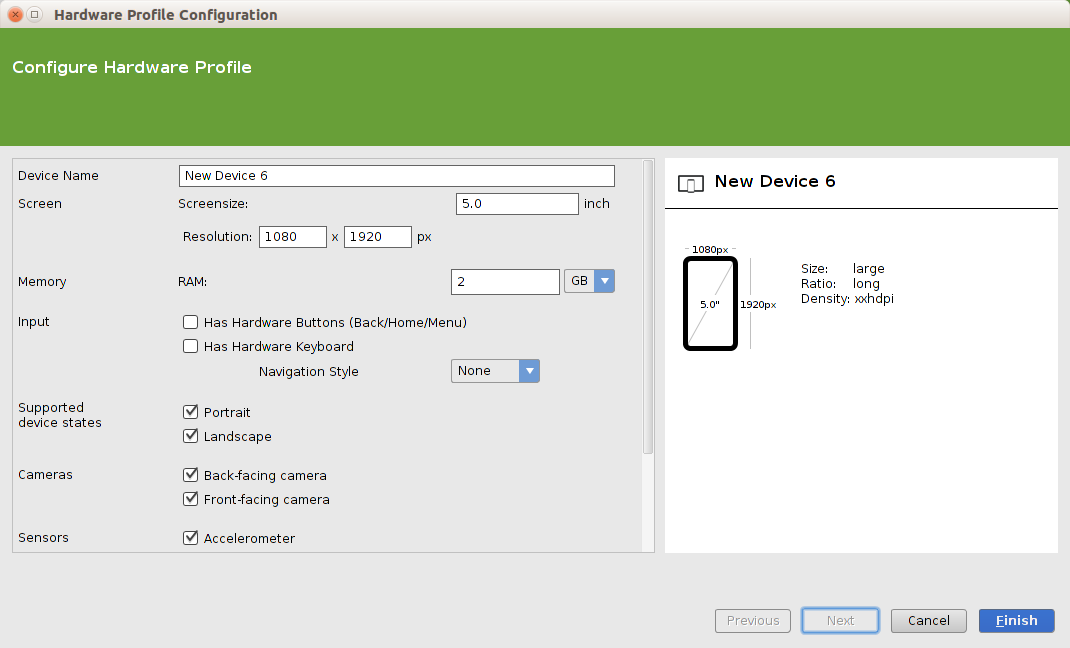
Figure 3. The Configure Hardware window when creating a custom device configuration.
- Your custom device configuration is now available in the list of device definitions (shown after you click Create Virtual Device). To continue preparing an AVD with your custom device configuration, select the new configuration and follow the instructions above to create an AVD with an existing device definition (and select your new definition).
Hardware options
If you are creating a new AVD, you can specify the following hardware options for the AVD to emulate:
| Characteristic | Description | Property |
|---|---|---|
| Device ram size | The amount of physical RAM on the device, in megabytes. Default value is "96". | hw.ramSize |
| Touch-screen support | Whether there is a touch screen or not on the device. Default value is "yes". | hw.touchScreen |
| Trackball support | Whether there is a trackball on the device. Default value is "yes". | hw.trackBall |
| Keyboard support | Whether the device has a QWERTY keyboard. Default value is "yes". | hw.keyboard |
| DPad support | Whether the device has DPad keys. Default value is "yes". | hw.dPad |
| GSM modem support | Whether there is a GSM modem in the device. Default value is "yes". | hw.gsmModem |
| Camera support | Whether the device has a camera. Default value is "no". | hw.camera |
| Maximum horizontal camera pixels | Default value is "640". | hw.camera.maxHorizontalPixels |
| Maximum vertical camera pixels | Default value is "480". | hw.camera.maxVerticalPixels |
| GPS support | Whether there is a GPS in the device. Default value is "yes". | hw.gps |
| Battery support | Whether the device can run on a battery. Default value is "yes". | hw.battery |
| Accelerometer | Whether there is an accelerometer in the device. Default value is "yes". | hw.accelerometer |
| Audio recording support | Whether the device can record audio. Default value is "yes". | hw.audioInput |
| Audio playback support | Whether the device can play audio. Default value is "yes". | hw.audioOutput |
| SD Card support | Whether the device supports insertion/removal of virtual SD Cards. Default value is "yes". | hw.sdCard |
| Cache partition support | Whether we use a /cache partition on the device. Default value is "yes". | disk.cachePartition |
| Cache partition size | Default value is "66MB". | disk.cachePartition.size |
| Abstracted LCD density | Sets the generalized density characteristic used by the AVD's screen. Default value is "160". | hw.lcd.density |
Creating Emulator Skins
An Android emulator skin is a collection of files that define the visual and control elements of an emulator display. If the skin definitions available in the AVD settings don't meet your needs, you can create your own custom skin definition, then apply it to your AVD from the advanced settings on the Verify Configuration screen.
Each emulator skin contains:
- A
hardware.inifile - Layout files for supported orientations (landscape, portrait) and physical configuration
- Image files for display elements, such as background, keys and buttons
To create and use a custom skin:
- Create a new directory where you will save your skin configuration files.
- Define the visual appearance of the skin in a text file named
layout. This file defines many characteristics of the skin, such as the size and image assets for specific buttons. For example:parts { device { display { width 320 height 480 x 0 y 0 } } portrait { background { image background_port.png } buttons { power { image button_vertical.png x 1229 y 616 } } } ... } - Add the bitmap files of the device images in the same directory.
- Specify additional hardware-specific device configurations an
hardware.inifile for the device settings, such ashw.keyboardandhw.lcd.density. - Archive the files in the skin folder and select the archive file as a custom skin.
For more detailed information about creating emulator skins, see the Android Emulator Skin File Specification in the tools source code.