To develop apps for Android, you use a set of tools that are included in Android Studio. In addition to using the tools from Android Studio, you can also access most of the SDK tools from the command line. Developing with Android Studio is the preferred method because it can directly invoke the tools that you need while developing applications.
However, you may choose to develop with another IDE or a simple text editor and invoke the tools on the command line or with scripts. This is a less streamlined way to develop because you will sometimes have to call command line tools manually, but you will have access to the same number of features that you would have in Android Studio.
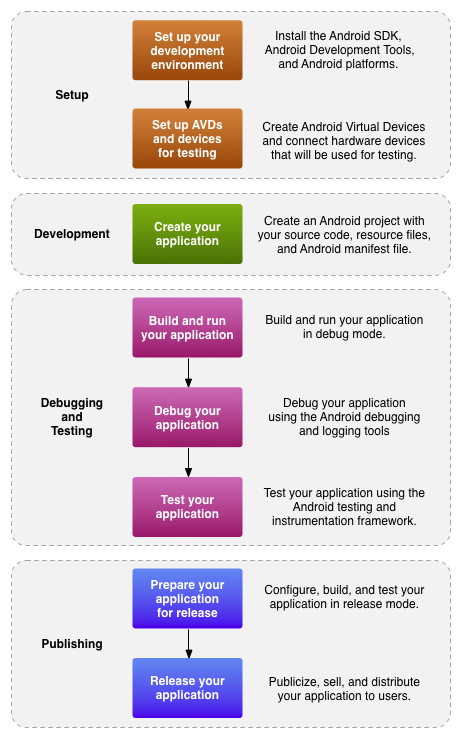
Figure 1. The development process for Android applications.
App Workflow
The basic steps for developing applications (with or without Android Studio) are shown in figure 1. The development steps encompass four development phases, which include:
- Environment Setup
During this phase you install and set up your development environment. You also create Android Virtual Devices (AVDs) and connect hardware devices on which you can install your applications.
See Managing Virtual Devices and Using Hardware Devices for more information.
- Project Setup and Development
During this phase you set up and develop your Android Studio project and application modules, which contain all of the source code and resource files for your application. For more information, see Create an Android project.
- Building, Debugging and Testing
During this phase you build your project into a debuggable
.apkpackage(s) that you can install and run on the emulator or an Android-powered device. Android Studio uses a build system based on Gradle that provides flexibility, customized build variants, dependency resolution, and much more. If you're using another IDE, you can build your project using Gradle and install it on a device using adb. For more information, see Build and run your application.Next, with Android Studio you debug your application using the Android Debug Monitor and device log messages (logact) along with the IntelliJ IDEA intelligent coding features. You can also use a JDWP-compliant debugger along with the debugging and logging tools that are provided with the Android SDK. For more information see Debug your application with the SDK debugging and logging tools.
Last, you test your application using various Android SDK testing tools. For more information, see Test your application with the Testing and Instrumentation framework.
- Publishing
During this phase you configure and build your application for release and distribute your application to users. For more information, see Publishing Overview.
Essential command line tools
When developing in IDEs or editors other than Android Studio, be familiar with all of the tools below, because you will have to run them from the command line or script.
- android
- Create and update Android projects and create, move, and delete AVDs.
- Android Emulator
- Run your Android applications on an emulated Android platform.
- Android Debug Bridge
- Interface with your emulator or connected device (install apps, shell the device, issue commands, etc.).
In addition to the above tools that are included with the SDK, you need the following open source and third-party tools:
- Gradle
- To compile and build your Android project into an installable .apk file(s).
- Keytool
- To generate a keystore and private key, used to sign your .apk file. Keytool is part of the JDK.
- Jarsigner (or similar signing tool)
- To sign your .apk file with a private key generated by Keytool. Jarsigner is part of the JDK.
If you are using Android Studio, tools such as adb and android
are automatically called by Android Studio so you don't have to manually invoke these tools.
You need to be familiar with adb, however, because certain functions are not
accessible from Android Studio, such as the adb shell commands. You might also
need to call Keytool and Jarsigner to sign your applications, but you can set up Android Studio
to do this automatically as well.
For more information on the tools provided with the Android SDK, see the Tools section of the documentation.